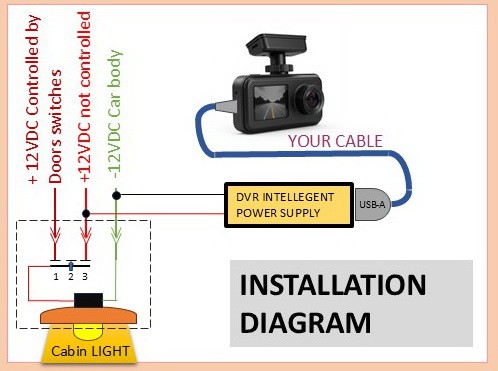
For the installation of ATmodule power supply you will need just a screwdriver, a knife and electrical tape. In the vehicle you need to remove your cabin light and find a uncontrolled positive power circuit feeding the light. To make it you need to take ATmodule and apply black wire to the metal part of your vehicle body. This can be done just by wrapping the screw of your cabin light and temporary putting it back to the metal hole. Then you can touch one by one each conductor (pin) of coming to the light wires/connector. Once you see either RED or GREEN light turns on at ATmodule you have found it. Now you need to strip insulation on the wire, tap to the conductor and wrap it with a small piece of electrical tape. Now take your power cable, plug to your dashcam, pull it to the cabin light opening and plug it into ATmodule usb port. Start vehicle engine. The GREEN LED should turn on at ATmodule and your dashcam will start recoding. Hide ATmodule and excess of wires to the roof space and install your cabin light back. Also, you need to pull black wire (negative conductor) through one hole of your light, wrap it around the cabin light screw and tighten it. That is it.
Here is step by step guide for ATmodule installation on: